The way to groom dogs with drop coat style will be influenced by the physical appearance of the dog body structure, ear and tail type, coat texture, color and the overall length of trim.
Styling options for head, ears and tail are truly varied, limited only by the pet stylist’s abilities, pet owner’s discretion and the pet’s lifestyle. A knowledgeable and talented dog stylist can impart style and flair to any trim option, creating an adorable haircut style for the dog.
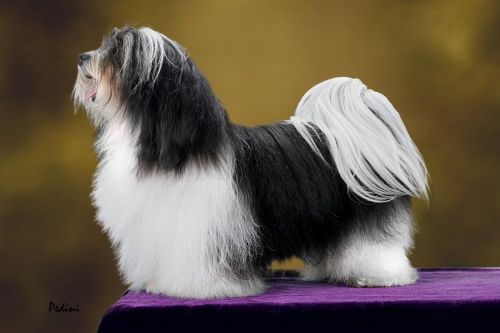
The common denominator of a “drop coat” is fine, straight hair texture. If you comb the coat up or fluff it out, it has a natural tendency to drop back towards the ground. Typical breeds with this coat type include Shih Tzus, Lhasas, Maltese or any dogs of similar coat type, purebred or mixed breed.
General Description
This trim style is highly versatile for many coat and body types. This application provides a low maintenance trim style for drop coat breed types that leaves the pet cute and cuddly. Most drop coated breed types are fun loving with sweet, soft expressions.
The coat is straight or wavy and considered non-shedding. A well executed trim on a drop coated pet should make the dog look like a charming, soft, fuzzy stuffed animal.
The face is round with a soft, kind expression. The ears and tail can be of various lengths based on your preference. In the finished trim, the pet is well-balanced, smooth and track free from scissor or clipper marks.
The Goal: The dog should look soft and cuddly, like a small stuffed animal. The coat is smooth and even without any scissor or clipper marks. Head, ear and tail styles can vary based on your preference:
- For trims using a shorter blade on the body, use the higher blending line near the tail as a transitional line. Change to a medium or longer guard comb to set the rump. If using a longer guard comb on the body, follow through to the blending areas and feather off.
- Head and ear styles are optional.
- Head and neck join just below the occiput.
- Legs fall in parallel lines from the shoulder. Use the shoulder muscle to set pattern line.
- Trim nails.
- Feet are rounded and face straight forward.
- Pads are trimmed close.
- Show off a powerful rear by accentuating a well angulated hind-end. Use the thigh muscle to set the pattern line.
- Lowest point of pattern should be at bend.
- Tail style is optional.
Clipper Work
Start the clipper work at the base of the occiput and pull the clipper towards you. If your clippers won’t glide smoothly over the shoulder/withers area, start your clipper work at that withers instead of the occiput. (Save the neck and shoulder area until the dog is sitting down.)
Work down the spine towards the tail and over the rump. Let each clipper stroke slightly overlap the previous stroke. Let the weight of the clipper do the work for you, all you need to do is let it glide smoothly along, following the natural contours of the pet.
Go completely over the dog once, then back brush if using a #4F, #5F or #7F blade. If using a medium to longer guard comb, do a body roll to get the coat to stand up off the body. The shorter guard is the in-between blade.
A combination of back brushing and a body roll may be used to set the coat up for the second pass. Repeat the entire body clipping a second time. Set the coat up and check for rough or high spots.
If the coat is not consistently smooth by the third pass, analyze your clipping methods and make the necessary corrections.
Blending Areas
When working with shorter guard combs, switch to a medium or longer guard for the blending areas. Swing over the rump area with a medium to long guard comb, cutting in the angulation as you work.
On the front legs, gently let the clipper fall off at the widest point of the shoulder, skimming and blending into the longer coat on the front legs. The goal is a smooth transition between the shorter, clipped coat and the longer, scissored coat.
Clipping too quickly in these areas will create tracking, which is undesirable. Maintaining a consistent pace as you feather off in the blending areas allows the coat to feed efficiently into the teeth of the blade. Hold the clipper at a consistent angle for a smooth, seamless transition.
Feet
Shave the pads with blades ranging from a #40 blade to a #15. Slide your hand down the dog’s leg, thumb toward the table, and pick up the foot. First, gently clip out the pad. Using your hand and fingers as a brace, clip off the excess hair that hangs beyond the outside edge of the foot.
Keep the blade level with the foot pad. Do not cut up into the side coat of the foot. You will need to finish off the foot with shears, while the dog is standing naturally on the table, to make them appear round and forward facing.
Soften the line with thinning shears, if desired. This technique allows you to both trim the pads and roughly round the foot, all in one motion. This technique is better for dogs with small to moderate feet and should not be used on dogs that have extremely poor fronts or extremely large feet.
Front Legs
Once the clipper work is effectively blended into the legs and the pads have been trimmed, there should be a little coat left to hand-scissor. When viewed from the front, the legs should create parallel lines, dropping in a straight line from the widest part of the shoulder. Feet should face forward and be neatly rounded.
Rear Legs
When viewed in profile, the correct angulation of the rear legs is accentuated by removing the bulk of the excessive hair over the hip and thigh areas with the longer guard combs.
When viewed from the rear, the legs appear straight and parallel to each other. When viewing the dog from this angle, think of a plumb line hanging straight down from the widest point of the thigh to the table.
Scissor off any coat that falls over these imaginary lines. The hocks are straight with feet that are rounded and face straight forward.

